Category: Advanced Features
Tags: product consistency, reference images, branding, e-commerce, Ray3, KeyFrame, aspect ratio, product showcase
Introduction
Dream Machine excels at keeping products and items consistent across multiple scenes and generations. Whether you're showcasing a consumer product, tech item, or branded merchandise, maintaining visual consistency is crucial for professional results. This guide reveals the methods and best practices professionals use to keep products looking identical across different scenes, ensuring your product appears with the same colors, shape, and details in every generation.
The Foundation: Quality Reference Images
The key to product consistency starts with your reference image. A high-quality reference gives Dream Machine the information it needs to accurately reproduce your product across multiple scenes and contexts.
Essential Requirements for Product References
Your product reference image should include:
Clean white or neutral background - Eliminates distracting elements and helps the AI focus on the product
Clear, even lighting - All product details must be visible without harsh shadows or overexposure
High resolution - Shows texture, features, and fine details clearly
Strategic positioning - Product positioned to show its key identifying characteristics
Pro Tip for Complex Products: For items with multiple states (like bags that open/close, devices with screens, clothing that folds), capture multiple angles. A closed pouch is harder for AI to replicate accurately than having reference shots of both closed and open states.
Step-by-Step Product Consistency Workflow
Step 1: Upload Your Reference Image
Start by uploading your product photo as a Reference Image. Make sure it meets the quality requirements above—this reference will be the foundation for all your generations.
Step 2: Reframe or Alter the Aspect Ratio (Optional)
Select 'Reference' in the Composer Window. Upload the image (such as a 3:4 or different aspect ratio sized image). For example, select 16:9 and IMAGE V2.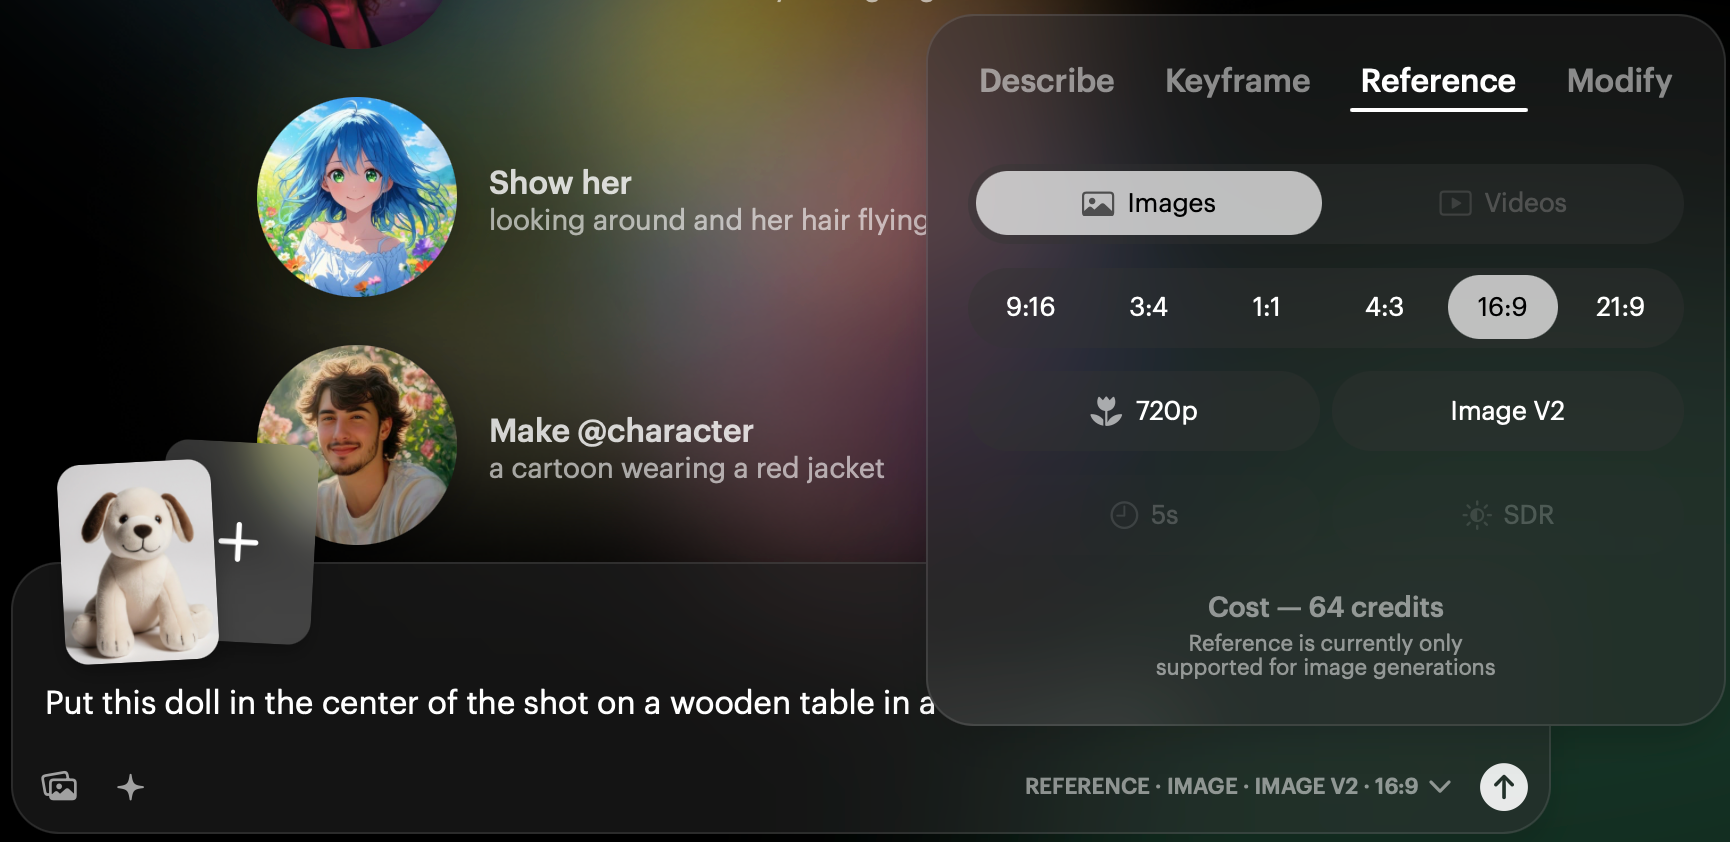
It is best to match the aspect ratio of your intended final scene:
16:9 for standard video
9:16 for vertical/social media
21:9 for cinematic
1:1 for square formats
This ensures your product maintains proper proportions in the final scene.
Example Test Prompt: "Put this doll in the center of the shot on a wooden table in a country kitchen"
Settings: Image V2, 720p, appropriate aspect ratio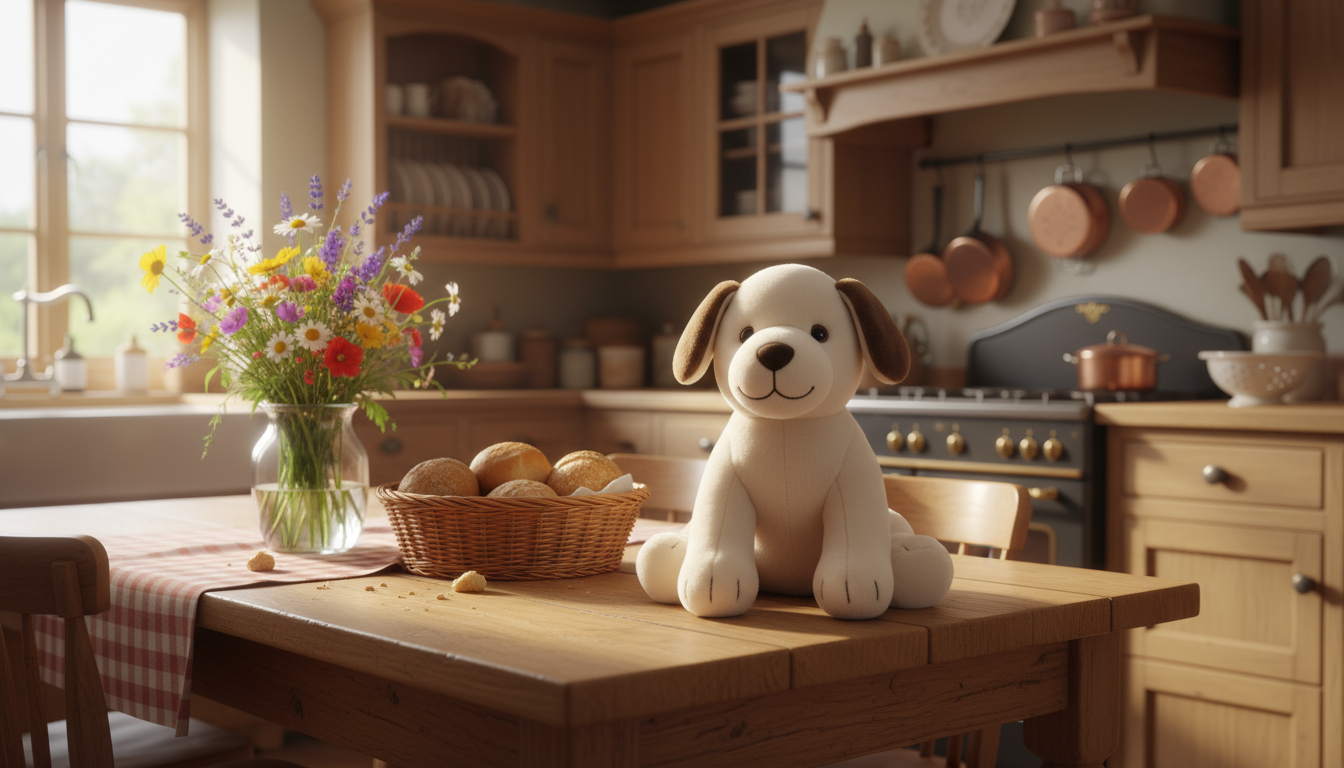
Step 3: Create a Test Scene
Generate a simple test scene with your product centered and clearly visible using 'KeyFrame'. This helps establish that the AI recognizes and can reproduce your product accurately.
Example Test Prompt: "Put this doll in the center of the shot on a wooden table in a country kitchen, dolly slowly around the doll. Same doll, same shape, same pose."
Settings: Ray3, 720p, Draft Mode (2 Versions), 16:9 or appropriate aspect ratio, 5 seconds
NOTE: Draft Mode is recommended as it saves credits. You can use HiFi and change the settings to 720p after you have a generation you are happy with. Be sure to DIRECT the camera in the scene.
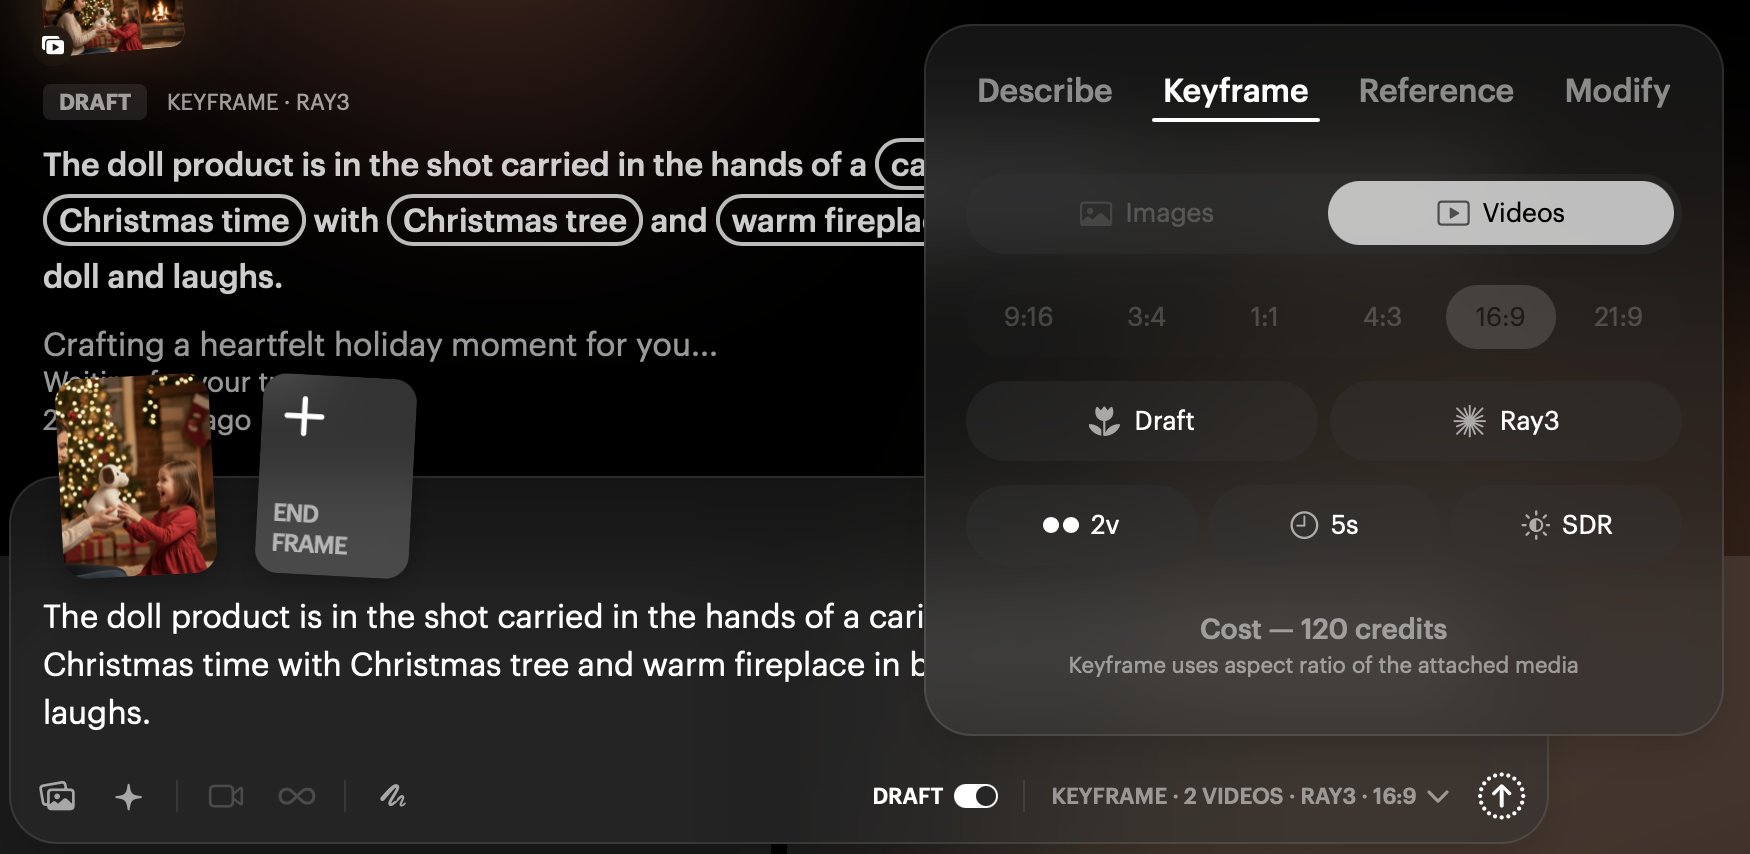
Step 4: Place Product in Context
Once your test confirms consistency, create scenes showing your product in realistic use cases or environments.
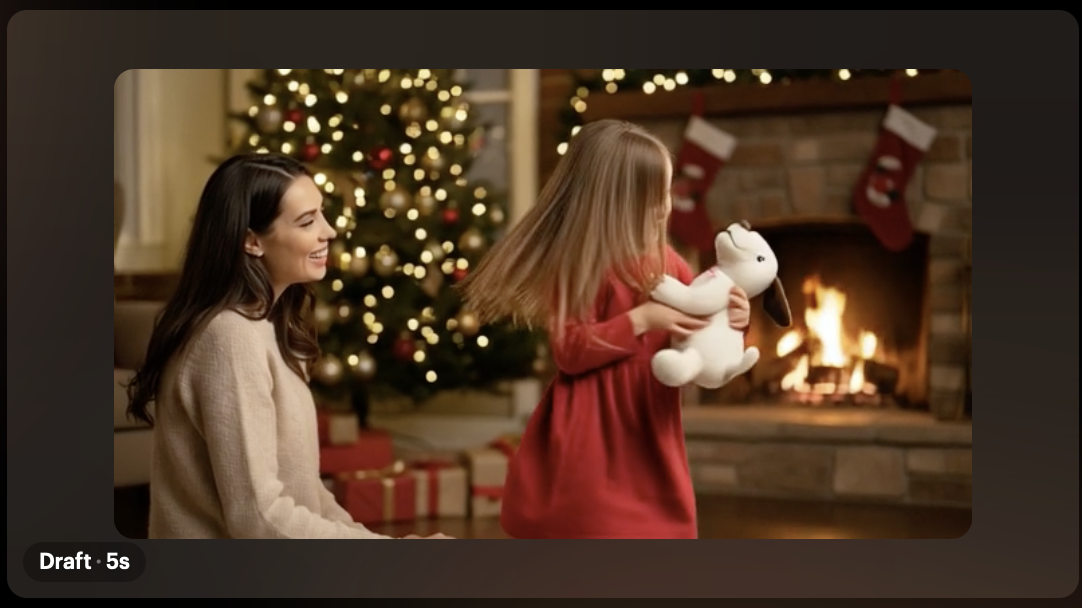
Example Contextual Prompt: "Put this doll in the shot carried in the hands of a caring mother at Christmas time with Christmas tree and warm fireplace in background."
Settings: Ray3, 720p, HDR ON, appropriate aspect ratio, 5 seconds
Then create the Ray3 video with your favorite image as the First Frame (KeyFrame):
Example Contextual Prompt: "The doll product is in the shot carried in the hands of a caring mother giving the doll to a girl at Christmas time with Christmas tree and warm fireplace in background. The girl hugs the doll and laughs."
Settings: Ray3, 720p, HDR ON, appropriate aspect ratio, 5 seconds
Critical Prompting Language
The way you phrase your prompts directly impacts results. The AI responds to clear, directive language—not conversational adjustments. Treat your prompts like stage directions, not casual suggestions.
DO USE: Direct, explicit placement instructions
"Put this [product] in the shot..."
"Place this [product] on the..."
"Show this [product] being held by..."
DON'T USE: Conversational or vague language
"No, I don't want it on the left, move it over a bit more to the right"
"Can you make it bigger?"
"Try putting it somewhere else"
Positive vs. Negative Prompting
For best results with product consistency, always use positive prompting. Instead of describing what you DON'T want, focus entirely on what you DO want to see.
For more detailed guidance on prompting techniques, check out our article: Understanding Prompting for Dream Machine
Advanced Tips for Specific Product Types
For Products with Branding
Ensure logos and text are clearly visible in reference images
Use prompts that explicitly mention brand elements: "Show the [brand name] logo clearly visible"
For Products with Reflective Surfaces
Mention material properties in prompts: "metallic surface," "glossy finish," "matte texture"
This helps the AI maintain consistent material appearance across lighting conditions
For Wearable Products
Show how the item is worn/attached in your reference
Use anatomically specific placement: "attached to the hip," "worn on the wrist," "held in the right hand"
View Real Examples
See the complete workflow in action—from reference image to finished contextual scenes:
Example Board: https://dream-machine.lumalabs.ai/share/board/a92e24c8-3535-4ac4-b3ac-29b9ff864b2e
This board demonstrates the full progression of product consistency techniques with real results you can study and learn from.
Troubleshooting
What happens if my product looks different in each generation?: Your reference image may not be clear enough, or your prompts may lack specific directive language. Ensure your reference has a clean background, even lighting, and high resolution. Use explicit placement instructions like "Put this [product] in the shot" rather than conversational adjustments.
Why doesn't the AI recognize my product's brand logo or text?: Logos and text must be clearly visible in your reference image with sharp focus and good contrast. In your prompts, explicitly mention the brand elements: "Show the [brand name] logo clearly visible." Small or blurry text in reference images will not reproduce accurately.
My product with reflective surfaces looks inconsistent across different lighting...: Add material property descriptions to your prompts such as "metallic surface," "glossy finish," or "matte texture." This helps the AI understand how the surface should interact with different lighting conditions in various scenes.
The AI keeps changing my product's position when I just want to adjust the scene...: Avoid conversational phrases like "move it a bit to the right." Instead, create a brand new prompt with exactly where you want the product positioned using directive language. The AI doesn't understand iterative adjustments—it needs complete instructions each time.
My product that has multiple states (open/closed, on/off) isn't consistent...:Capture multiple reference photos showing those different states. A single reference of a closed bag won't help the AI understand what it looks like open. Provide references for each state you plan to showcase.
Frequently Asked Questions (FAQs)
1. What makes a good product reference image for Dream Machine? A good reference image has a clean white or neutral background, clear even lighting showing all product details, high resolution that captures textures and features, and strategic positioning that shows key identifying characteristics of the product.
2. Should I use Draft Mode or HiFi when testing product consistency? Use Draft Mode for initial testing and iterations as it saves credits while confirming the AI recognizes your product correctly. Once you have a generation you're happy with, you can switch to HiFi and adjust settings to 720p or higher for final output.
3. What aspect ratio should I use for my product scenes? Match the aspect ratio to your intended final use: 16:9 for standard video, 9:16 for vertical/social media content, 21:9 for cinematic presentations, or 1:1 for square formats. This ensures your product maintains proper proportions in the final scene.
4. How do I keep branded products consistent with visible logos? Ensure logos and text are clearly visible with sharp focus in your reference images. In your prompts, explicitly mention brand elements such as "Show the [brand name] logo clearly visible" to direct the AI's attention to these important details.
5. Can I adjust my product's position after generating a scene? You cannot make conversational adjustments like "move it right a bit." Instead, create a new prompt with complete, directive instructions specifying exactly where you want the product: "Place this [product] on the right side of the table." The AI needs full instructions each time, not iterative changes.
Related Articles
Original Author: Chris Roebuck, Luma AI – Customer Support - Education
Original Creation Date: Fri, 17 Oct 2025 at 12:54 PM
Updated by: KB Conversion Team
Was this article helpful?
That’s Great!
Thank you for your feedback
Sorry! We couldn't be helpful
Thank you for your feedback
Feedback sent
We appreciate your effort and will try to fix the article