Here's a streamlined workflow based on proven methods to create a consistent character that animates using Modify - from previously created captured movement. It should be noted that you can do this with Photo realistic, Anime/Animation, 3D, VideoGame, Claymation, or any style of Reference Character - as long as the anatomy lines up with that of the specific 'Control Video' footage.
Step 1: Prepare Your Character Reference
Prepare your Character Reference image of your character in clear, good, clean lighting. If possible, create a small "character sheet" with a few angles and expressions. This gives the AI a clear target.

Step 2A: Create Your Master Character Sheet in Dream Machine
1. Select BOARDS on the left column, then hit the Plus Icon at the bottom, use the Upload button to upload the reference image and in the Control Pane select Image V2 (and the Aspect Ration, Quality, etc).
2. Be sure you are in Reference mode.
3. Use a detailed, positive prompt like:
"Create a clean 6-panel model-sheet reference board of this @character. Layout: 3 rows x 2 columns, plain white background, same character, same outfit, same hair, same face, same makeup, same aesthetic. Panel 1: @character front view, relaxed neutral pose, arms relaxed at sides. Panel 2: @character3/4 view (facing left). Panel 3: @character side profile (right side). Panel 4: @character Close-up face front, neutral expression. Panel 5: @characterClose-up 3/4 face (right side). Panel 6: @character back view. white background."
Use 9:16 or 16:9 - ideally the SAME Aspect Ratio you plan to make animations.
4. Generate and save the best result. This can be used as your master reference image.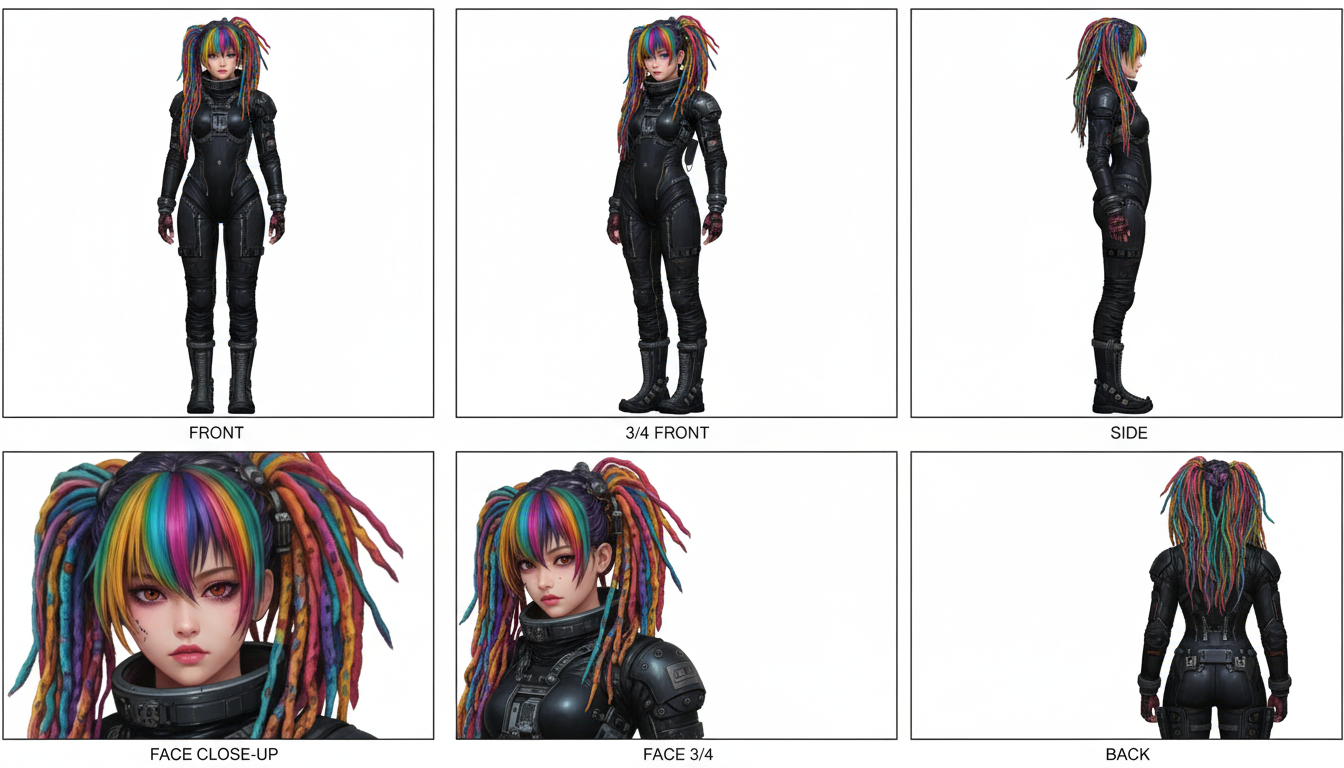
Alternative/Added Step 2B: Generate Master Single Character Reference Image for the specific shot
1. Upload your master reference image.
2. In your prompt, always use the `@character` tag and include preservation phrases
3. Example prompt:
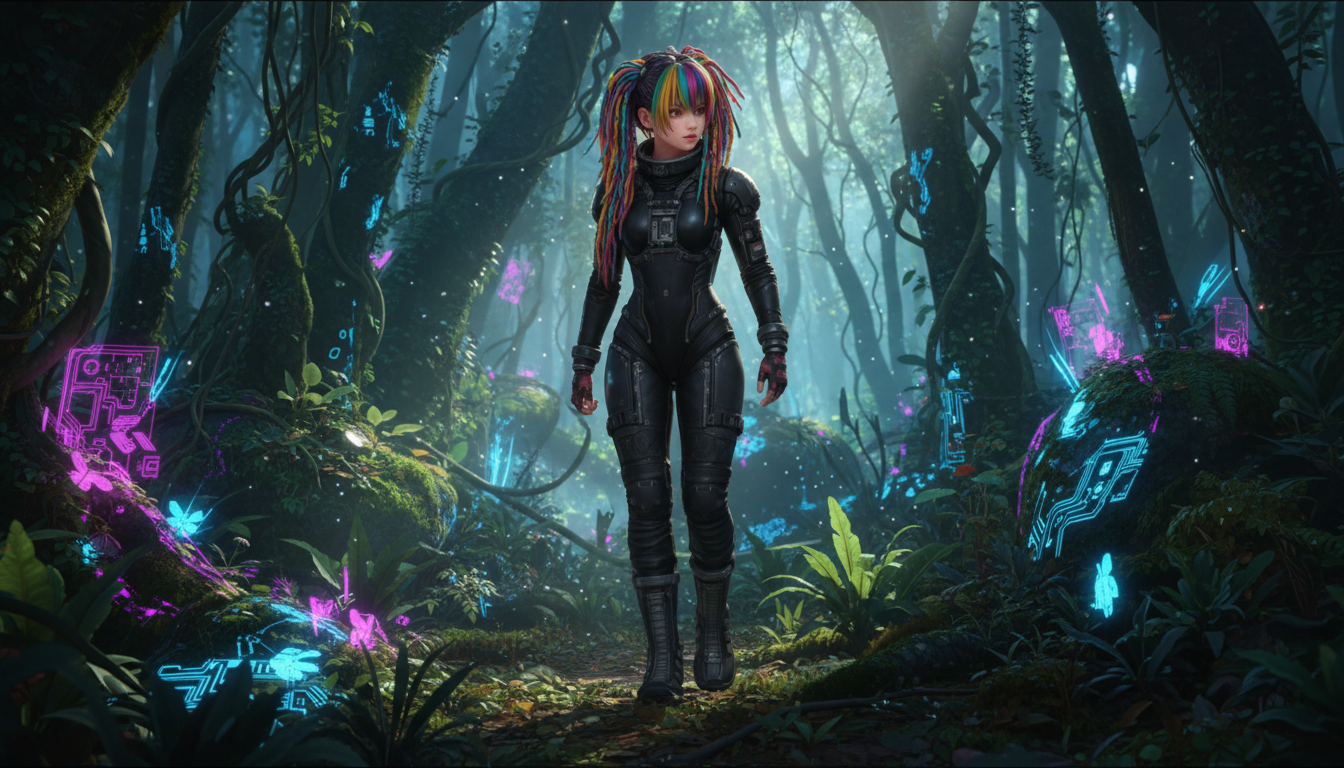
"The same @character in modern 3D animation style looking side to side while cautiously and slowly walking through a forest, same face, same hair, and same features"
Notice that we can prompt to change the output STYLE (in this case to '3D Animation')
Step 4: Create a (Test) Video of the Character
1. Select 'Make Video...' and choose the recommended settings below ("Keyframe Mode"):

2. Be sure to use Ray3 in DRAFT Mode to save time and credits.
3. Use the same prompt: "The same @character in modern 3D animation style looking side to side while cautiously and slowly walking through a forest, same face, same hair, and same features"
4. Once the Generations are complete, select the best one, or try it again with 'Show More'
5. Once you have selected on e you like, use the 'HiFi' button to upgrade the video to 720, 1080 or 4K. Select HDR for more vibrant colors, but note that it will switch back to SDR if extended.


https://dream-machine.lumalabs.ai/share/idea/4a4d399d-b3f7-491b-bff1-3f5a58c1836e
Step 5: Animate with specific control video with Modify
If you need to animate your character in a specific way, you can record a specific action in an existing video, then use Modify:
'Specific Control Video' example (courtesy of 'Reallusion ActorCode'):
1. Select Modify, upload your specific control video. Be sure the hair and/or costume are of similar style.
IMPORTANT: If you have a bald male actor acting out the scenes, and the Start Frame's character has long hair, the model may output a bald. Ray2 shines and outputs best when you add props/decor/hair/etc to the character acting out the physical animations - making sure that the control video character resembles the (animation) character you are trying to make consistent!
2. Next choose Start Frame and upload an image. It is also important to have the First Frame POSE of your character MATCH the First Frame Pose of your Control Video.
3. Adjust your Modify Settings, and make sure to set your Strength to: Flex 1 or Flex 2 for subtle changes.
4. Then pair your settings with a Strong Prompt that describes in detail the actions you want to see in the final outputted video - Example prompt for a dancing video: "The @character cyberpunk woman in black stands and dances and follows the robots motion. Keep the same womans face, same dreads, same facial expression, same outfit."
5. Hit Generate.
You should get something like this - which you may need to trim/edit with a third party video editing software:
Note: It would have made a better output, if we had added similar dreads to the control video.
https://dream-machine.lumalabs.ai/share/idea/0219d92d-4666-4dac-973d-186e9191a603
Essential Resources
Here is a detailed guide that covers all this< and is a great resource for keeping animated or real characters consistent.
Character Consistency guide:
Results and Prompting
There are some instances when the video doesn't always produce the exact animation you envisioned. I would recommend patience, as this is a standard in the AI Video generating industry at the moment, though we are always striving to improve our models. That said - if you get some results that are not what you prompted, try either changing up your prompts, running them through an LLM (Like Chat GPT, Claude, etc), and/or using repeated commands at the end of the prompt - and try to never use 'negative prompts'.
Positive vs Negative Prompting guide:
Was this article helpful?
That’s Great!
Thank you for your feedback
Sorry! We couldn't be helpful
Thank you for your feedback
Feedback sent
We appreciate your effort and will try to fix the article